
Aki's AWDG Series
|
[Chapter #2 - ]>>
|
Introduction to the AWDG Series
Bases used as examples within this series is just for educational purposes so just because one base is 'weaker' compared to another or compared to what the general 'standard of top tier base' is is different, doesn't mean the value of the base is any less. This means don't just ignore the base just because it's not up to your standards, but use the idea that I'm describing behind it to develop your own bases better. I'm not here to describe how good the base is, I'm here to describe how the base adapts to the concepts.
I have written a few guides previously before this series, so during the course of trying to explain the chapter's topic, I most likely will refer back to some instances of other guides because of how interconnected these guides are. If you have read these guides prior to reading this series, great! You'll be able to pick up alot more than other people. If you haven't read the guides which I'm referencing to, I'll try my best to write based on the assumption you haven't read any of the other guides. Of course some materials might be repeated but that's how much things connect.
I have written a few guides previously before this series, so during the course of trying to explain the chapter's topic, I most likely will refer back to some instances of other guides because of how interconnected these guides are. If you have read these guides prior to reading this series, great! You'll be able to pick up alot more than other people. If you haven't read the guides which I'm referencing to, I'll try my best to write based on the assumption you haven't read any of the other guides. Of course some materials might be repeated but that's how much things connect.
Chapter #1 - The Zones of the Base
WIthin this chapter, I WON'T be discussing the effects of Queen Walk, or Zap-Quake Dragons as that is another chapter.
The requirements for each zone is mostly the fact that
a) sustain itself from loons and hogs even after the use of 1 spell (can be mutual destruction
b) usually has 1/4th the amount of defenses, buildings and traps
c)
a) sustain itself from loons and hogs even after the use of 1 spell (can be mutual destruction
b) usually has 1/4th the amount of defenses, buildings and traps
c)
When it comes to a base, you need to have a minimum of 3 Zones, within your base. A Queen Zone, a Main Kill Zone, a Secondary Kill Zone.
The reason for this is because of the fact that your enemies usually has 3 options as well.
King Swap with your Queen (1/3)
-OR bring another golem or two, and then take out you queen + 1 Kill Zone.
then back end hogs.
Taking Queen Zone, Main Kill Zone (2/3)s, and leaving last Kill Zone (1/3)
So for example if they wanted to take out your Queen + one Kill Zone, their army compostion might be 3 Golems, 8 Wizards, (+WB), King, Queen + A Jump Spell, and a Rage Spell. Equivalent of 1/2 of their army. With the remaining half of their army will be 2 heals, 14-18 hogs for the remaing 1/3 Kill Zone.
Taking Only Queen Zone, leaving 2 Kill Zones
If they decide they want to just want to take the Queen and leave the rest to hogs, they might Just Take 1-2 Golem, 4-8 wizards (+WB), King, AND/OR Queen + Jump.
If they left that remaining 2 Kill Zones, they'll probably use between 22-26 Hogs, with minimum 2 heals in order to kill these two Kill Zones.
For for this reason, is the reason why having minimum 1 Queen Zone, and 2 Main Kill Zones is a requirement. The Main Kill zones might both be small compartments, but most of the time they minimum have 2 spring traps, 1 giant bomb within the section.
----
The Different Types of Zones
Queen Zone has her own rules which is described in my [Offset Queen Guide] of trying to box her in her own area. The reason why the current TH9 War Model of having a [30% Queen Ratio, 70% AD] has to due with the fact that the Queen Area by itself is a threat to the overall attack if you disregard her. Loons, Hogs can't do any damage to her so she has to be taken account for. With that being the case, the enemy most likely has to exchange their King with the Queen.
Now when it comes to the Kill Zones, it usually refers to the fact that it has heavy DPS, and has springs and maybe Double Giant Bombs. Double Giant Bombs can be either used internally within this "Zone" or it can be used between different "Zones" (described in my [Groups, Sections, Territory Guide]). Sometimes these zones might not contain much, for example there might be an area where it's just boxed in with walls with just one Cannon, one archer tower, a spring trap, and a wizard tower. This is considered a "secondary" zone where 2 of these can be equivalent to one Kill Zone.
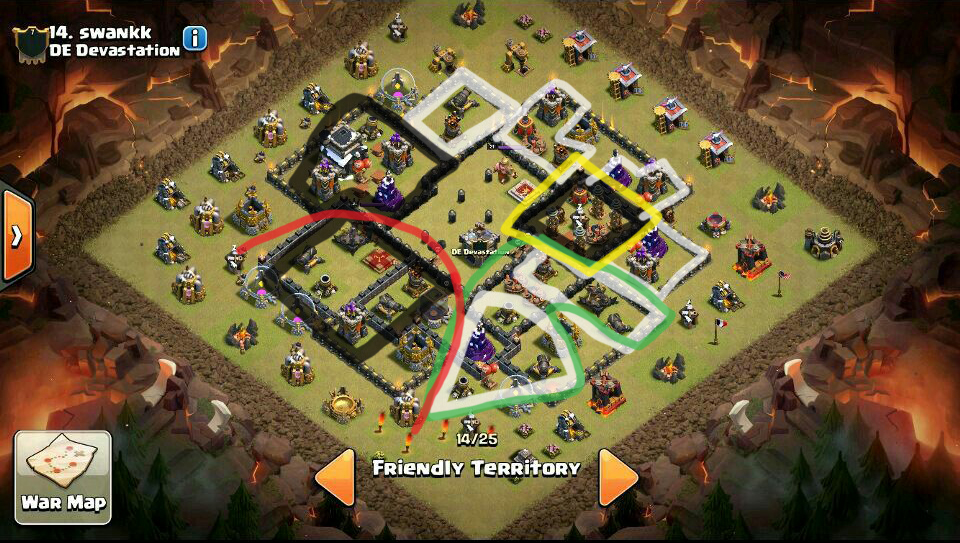
Here is an example base where black describes "Main Kill Zones", and white is the "secondary Kill Zones". It attempts to do an empty core style. It's alittle confusing with the colours (which I apologize) but this colours have meaning.
The Red "Zone": It's the Queen Area within this base. As you can see, there is the DE, Gold Storage cutting it between the south side defenses, as well as the compartments of the walls. This by itself, 1 Xbow, 1 AD, 2 Cannons, and 1 Archer Tower + Queen is a really threaten Zone even without springs or giant bombs.
The Green Zone: If you look at this image, you can see the fact that it contains two groups. If you look at the groups individuals, you can see the fact that a mortar, a wizard tower, and a cannon cannot sustain itself from a heal and hogs therefore it's not as threaten. AD, Xbow, and Cannon is another group by itself, where cannot survive against hogs. But these two groups, form their own "Kill Zone" with the fact that their coverage area is close to each other as well as the fact that there is a DGB separating these two.
Yellow, Tesla Farm: Is considered a "Main Kill Zone", threaten by itself, has springs, has a Single Giant Bomb, as well as the fact that it's paired with 3 other secondary groups of Wiz + Archer Tower.
Secondary Zone (Town Hall). Now If you look at the top left west side, you can see the fact that there is a mortar, Two Archer Towers, a Wiz that isn't within range of AD, as well as the fact that it has 3 springs.

