• News
    • All Guide and Info Status Page
  • Base Info
    • Divisions and Stages of TH9 War Bases
    • War Base Grades and Categories
    • Developmental Chart of Clan War Bases (Teaser)
    • War Base Building Rules & Guidelines List
    • Town Hall 9 War Base Building Concepts
    • War Base Reality Check
    • Hog Defense: A New Perspective
    • Anti-lavaloon Resources
  • Base Creating
    • TH9 War Models - Previous Model and Current Model
    • Base Creation - Empty Core Style Explanation
    • Town Hall 9 War Base Designing Considerations
    • Town Hall 8 War Base Designing Considerations
    • Base Creation - Offset Queen
  • Base Review
    • War Base Talk Series >
      • KBT #2 - KYW Sprite by Chief Grames
      • KBT - Monica by Dreamz
    • Farming Base Variables - How to Choose a Correct Farming Base
    • Groups, Sections, and Territories Guide
    • Metaki Series >
      • First Generation: Metaki Series >
        • Metaki Base Series #1
        • Metaki Base Series #2
        • Metaki Base Series #3
        • Metaki Base Series #4 (Scrapped)
      • Second Gen Metaki Series - Anti Lavaloon Concepts >
        • Second Gen: Metaki #5 - Arrowtip >
          • Second Gen: Risks and Potential Problems
          • Second Gen: Metaki Series #5 - Version 1.2 Explanation
          • Older Version of Series #5
        • Second Gen: Metaki #6 - Ovaki >
          • Older Versions of Ovaki
        • Second Gen: Metaki #7 >
          • Older Versions of Metaki #7
        • The Y Shaped Wizard Tower >
          • Conflicting Ratio with Y shaped Wizard Tower Concept
  • Buildings
    • Air Sweeper Analysis and Findings >
      • Three Different Uses of Air Sweeper
      • How to Effectively Use Air Sweeper
      • How it Affects Anti-3 Star Bases >
        • Protecting One Air Defense
        • Protecting Two Air Defenses
    • Air Sweeper Placement Guide (TH7-8)
    • Double Giant Bomb Guide >
      • The Hourglass Shape
    • TH9 Single Bomb Usage
    • Archer Queen Level "Sweet Spots" Analysis
  • Others
    • Anti-3 Star Bases Characteristics(old)
    • Weaknesses of Anti-3 Star Bases (old)
    • Layer Scouting (old)
    • Clan Management >
      • Templating For War
      • When to Search?
      • Management - Compilation Links
    • Clan Castle Killing
    • Dragon (TH8)

Conflicting Ratio with Y Shaped Wizard Tower

Only read this after you have read my [20 Grid Concept] and or my [Characteristics of War Bases] or you won't understand.
Picture
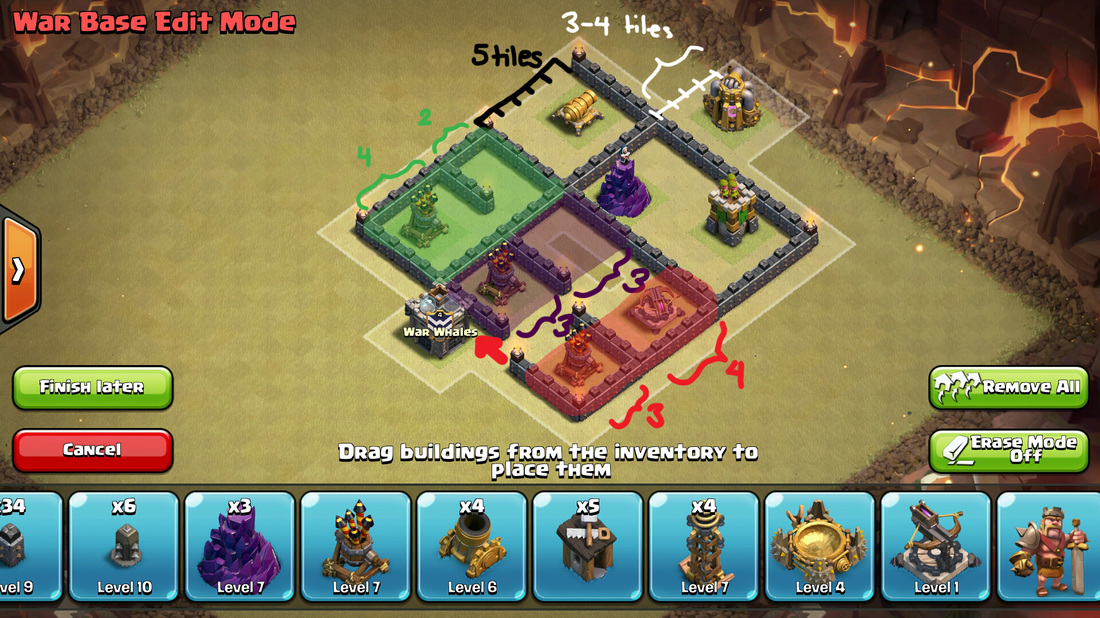
I've explained in my [Metaki #6 - Ovaki] the reason why I'm testing out this set up, and the weakness to this set up is it is too big of a compartment.  There is a reason behind this though.  If you look at this image, you can see 3 other types of ratios I've tried to do but they all have their advantages and disadvantages.

Green: the 4-2 5-4 Ratio

In this ratio, it offers three layers of buildings, allows double giant bomb to exist, more layers, you can put a tesla there so it works well with wizard tower.  The problems with this ratio is that it a HUGE waste of walls, only teslas are the ones that can fit inside.

Purple: The 3-3 5-4 Ratio

In this ratio, It offers out a more decent design element of creating more layers as well as placement of storages on the second section.  Problem with this is it is almost like a revival of the "Hog Ring" 

Red: THe 3-4 5-4 Ratio

The red ratio is alittle better when it comes to solving the problems as well as it offers a DGB location. Problem lies with the fact that the wall requirements is almost the same or even more than the green ratio, and also the fact the wall conflicts with where the clan castle is.  This ratio isn't the worse but it still has some flaws.

No matter which ratio is picked, they all offer 2 problems. 1. They use up alot of walls. 2. There is no space for storages.  This is the most troubling feature when it comes to trying out this set up with the Air defense and the wizard tower's placement conflicting with each other.

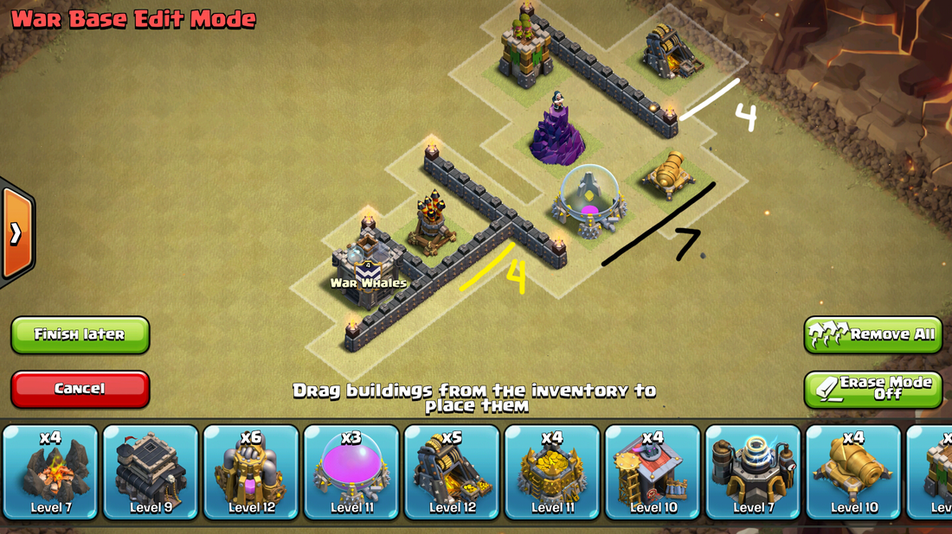
Yellow: experimental 4-7-4 ratio

Picture
In the end, I naturally went with a 4-7-4 ratio which allowed fewer walls to be used, storages be to put, as well as DGB location as the second layer.  The cost of this setup is that I lose the tertiary layer and more room for enemy golems to move about.

Conclusion

In conclusion, I'm still experimenting with the ratios when it comes to walls and the Y shaped wizard tower set up.  It's my current path towards creating an Anti-lavaloon base and this Y shaped set up could lead to a dead end, unless I'm able to find the perfect ratio, or manage to hybrid it with another ratio,.  The outlooks of this path to be honest isn't the best so I would not recommend anyone else experimenting with this design.
Powered by Create your own unique website with customizable templates.